If your Keurig says "add water" but the reservoir's full, it's likely due to a malfunctioning water sensor or a blockage. First, check the placement of the reservoir and make certain it's seated properly. Inspect for debris or clogs in the reservoir and the float mechanism. Clean the sensor area and consider resetting the machine by unplugging it. For ongoing issues, there are more tips and solutions you might find helpful.
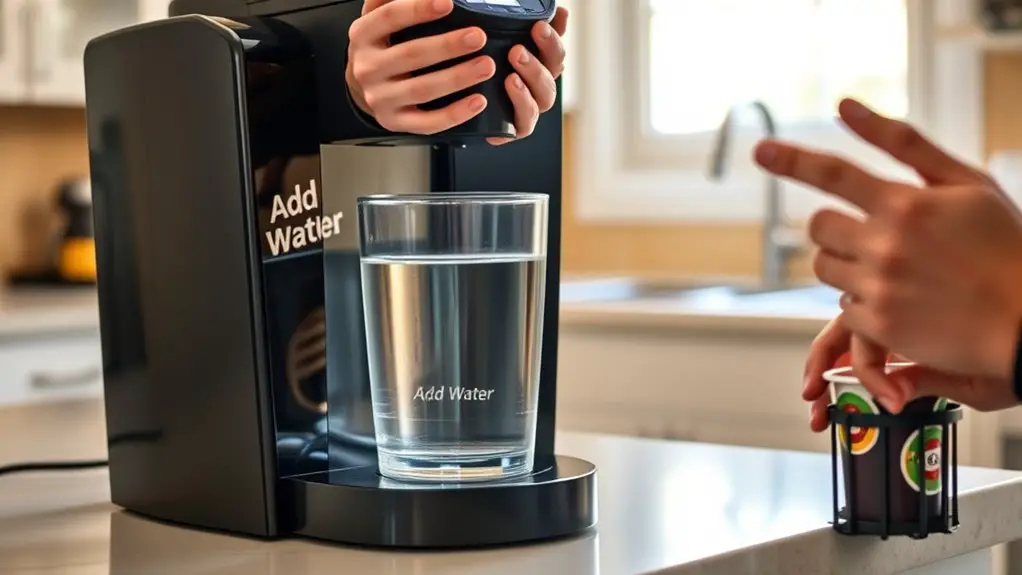
Understanding the "Add Water" Notification
When you see the "Add Water" notification on your Keurig, it can be frustrating, especially if you know there's water in the reservoir. This issue often relates to the water sensor, which detects the water level. If the sensor malfunctions or gets blocked, it might signal an empty reservoir incorrectly. Keurig troubleshooting often involves addressing this sensor. Begin by removing the water reservoir and cleaning both the reservoir and the sensor area. Check for any debris or mineral buildup that could obstruct the sensor's function. Once you've cleaned these parts, reattach the reservoir and see if the notification persists. Understanding the role of the water sensor is vital for maintaining your machine's efficiency and ensuring a hassle-free brewing experience. Regular maintenance can prevent overflow problems that may lead to similar notifications.
Common Causes of the Issue
Several factors can lead to the "Add Water" notification appearing even when there's water in the reservoir. One common cause is water sensor issues, where the sensor fails to detect the water level accurately. This can happen due to mineral buildup or debris obstructing the sensor's functionality. Additionally, a float malfunction may occur, preventing the float from rising with the water level. If the float gets stuck or damaged, it won't signal the sensor correctly, leading to the erroneous alert. Regular maintenance of your Keurig, including cleaning the water reservoir and ensuring the float moves freely, can help prevent these issues. Identifying the root cause can empower you to take the necessary steps for a smooth brewing experience. Conducting descaling processes regularly is essential to avoid mineral buildup that can affect the sensor's performance.
Checking the Water Reservoir
To resolve the "Add Water" issue, it is essential to check the water reservoir thoroughly. First, verify the reservoir is correctly placed on the machine; improper placement can cause misreading of the water level. Remove the reservoir and inspect its interior for any clogs or debris that may obstruct the sensor. Next, fill the reservoir to the appropriate water level, making sure not to exceed the maximum fill line. After refilling, securely reattach the reservoir to the brewer, confirming it sits firmly in place. This simple check can often resolve the issue, allowing your Keurig to function as intended. If the problem persists, additional troubleshooting may be necessary.
Inspecting the Float Mechanism
To resolve the "Add Water" issue, you'll need to inspect the float mechanism in your Keurig. This component plays an essential role in detecting water levels, and any obstruction or buildup can lead to inaccurate readings. Regular cleaning and maintenance of the float will help guarantee it functions properly.
Understanding the Float Component
The float component in your Keurig plays an important role in detecting water levels within the reservoir. This float mechanism consists of a buoyant piece that rises and falls with the water level, signaling the machine whether to brew or display the "Add Water" message. If your Keurig shows this alert despite having water, the float may be stuck or malfunctioning. Inspect the float for debris or blockages that could prevent its movement. A properly functioning float mechanism guarantees accurate water level detection, allowing you the freedom to brew your favorite coffee without interruptions. Understanding how this component works is vital for troubleshooting issues and maintaining your machine's performance.
Cleaning and Maintenance Tips
Regular cleaning and maintenance of the float mechanism can prevent the "Add Water" issue in your Keurig. First, unplug the machine and remove the water reservoir. Inspect the float for any debris or calcium buildup. Use gentle cleaning techniques, like a soft brush or cloth, to clear any blockages. Rinse the float thoroughly under warm water to make sure it's free from residues. Make it a habit to check the float during your maintenance schedule, ideally every month. This proactive approach not only keeps your Keurig functioning smoothly but also enhances its lifespan. By incorporating these simple steps, you'll maintain peak performance and enjoy your coffee without interruptions.
Cleaning the Water Reservoir
Since a clean water reservoir is essential for your Keurig to function properly, taking the time to clean it regularly can prevent the "Add Water" error from occurring. Start by unplugging your machine and removing the water reservoir. Use warm, soapy water and a soft sponge to scrub the interior and exterior surfaces. Pay special attention to any mineral build-up, as it can obstruct the water flow. Rinse thoroughly to eliminate soap residue. If needed, employ cleaning techniques like vinegar or descaling solutions to break down stubborn deposits. After cleaning, dry the reservoir completely before reattaching it to your Keurig. Regular maintenance of the water reservoir not only enhances performance but also guarantees the quality of your coffee. Additionally, regular descaling helps to prevent internal blockages that may contribute to the "Add Water" message.
Resetting Your Keurig
After ensuring your water reservoir is clean, you might still encounter the "Add Water" message due to a glitch in the system. To resolve this, you can perform a reset procedure through power cycling. Here's how to do it:
- Unplug your Keurig from the power source.
- Wait for at least 30 seconds.
- Plug it back in.
- Turn on the machine.
- Run a water-only brew cycle without a K-Cup.
This reset procedure often clears minor issues, restoring your machine's functionality. Additionally, keeping the exit needle clean can prevent further malfunctions. If the message persists, consider checking for clogs or other malfunctions. Following this method gives you a sense of control over your brewing experience, allowing you to enjoy your coffee without interruptions.
Regular Maintenance Tips
To keep your Keurig running smoothly and prevent issues like the "Add Water" message, it's essential to perform regular maintenance. Establish a maintenance schedule that includes descaling every three to six months, depending on your water quality. Regular upkeep also involves cleaning the needle with a paperclip to remove coffee grounds and ensuring the water reservoir is clean and free of debris. Check the water intake and exit valves for blockages, which can disrupt water flow. Additionally, consider replacing the water filter every two months for peak performance. By incorporating these practices, you'll not only enhance the longevity of your machine but also enjoy consistently great-tasting coffee without interruptions. Furthermore, regularly inspecting the gasket seal can help prevent leaks and maintain optimal performance.
When to Seek Professional Help
While many issues with your Keurig can be resolved through simple troubleshooting, there are times when seeking professional help becomes necessary. Recognizing the signs of malfunction is essential to maintaining your machine's performance. If you notice any of the following, it might be time to call in professional services:
- Persistent error messages that won't clear
- Inconsistent brewing temperatures
- Unusual noises during operation
- Leaking water from the machine
- Failure to brew despite having water in the reservoir
Addressing these signs early can save you from costly repairs or replacement. Don't hesitate to reach out for expert assistance when these issues arise, ensuring you continue enjoying your favorite brews without interruption.
Frequently Asked Questions
Can I Use Bottled Water in My Keurig?
Absolutely, you can use bottled water in your Keurig! The bottled water benefits include improved taste and consistency, plus it's often filtered. Just make sure it's compatible with your machine's water filtration system for ideal results.
How Often Should I Clean My Keurig?
For best performance, clean your Keurig every three to six months. Regular maintenance tips include descaling and rinsing the water reservoir, ensuring your machine brews coffee without issues and maintains its longevity.
What Should I Do if My Keurig Leaks?
Did you know nearly 20% of Keurig users experience leaks? For effective Keurig troubleshooting tips, check the water reservoir, guarantee proper placement, and inspect for cracks. Common leakage causes include worn seals or clogged tubes.
Is It Safe to Descale My Keurig With Vinegar?
It's safe to descale your Keurig with vinegar; its acidity helps remove mineral buildup. However, consider descaling alternatives like dedicated descaling solutions for ideal performance and to avoid potential residue from vinegar affecting your coffee's taste.
Does My Keurig Have a Warranty for Repairs?
Wondering if your Keurig's covered? Most models do have a Keurig warranty, offering repair options for specific issues. Check your purchase details to access the benefits and enjoy your coffee hassle-free.